OptiNod Academy
Bat Pattern: Deep D, Tight Invalidation
This article breaks down the Bat pattern into a shallow B, an 88.6% D, and invalidation near X, treating it as a tight-risk setup rather than a reason to chase price.
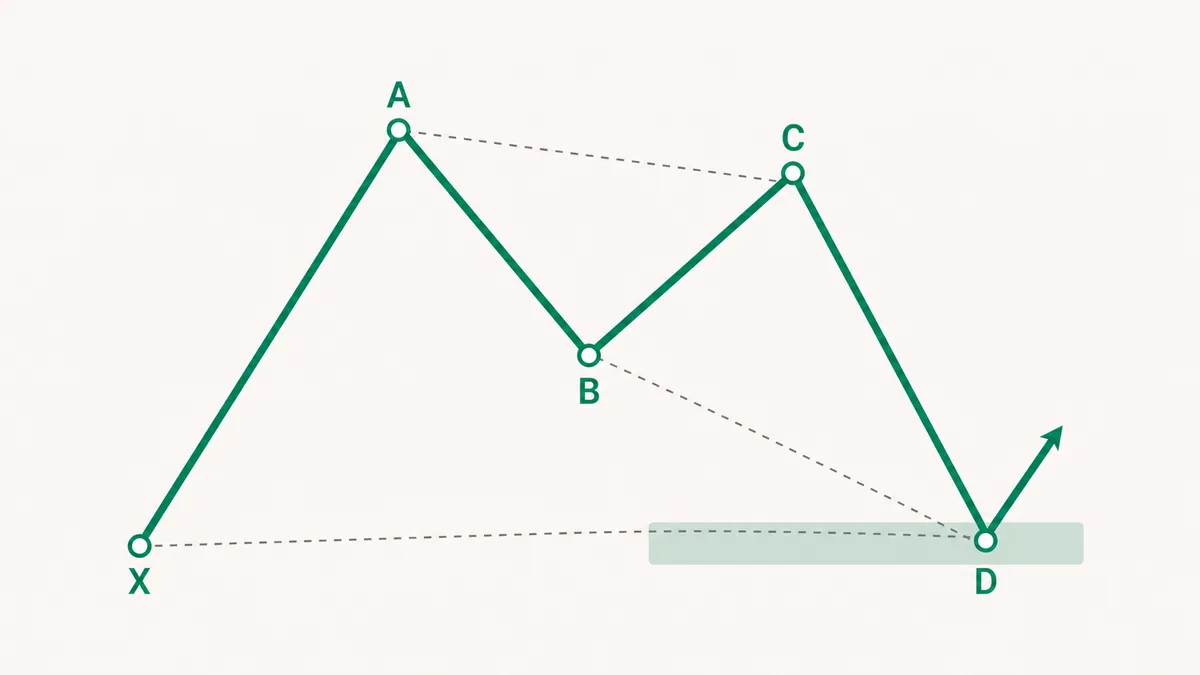
In a Bat, the key point is that the stop can be kept tight near X.
The Bat pattern is a harmonic setup where D reaches deeper than in a Gartley. If you trade only because price has reached the 88.6% retracement, you are effectively expecting a reversal just because price is near X. That often leads to entering without a clear plan for where the stop should go beyond X.
But a Bat is defined first by B. B must stall at a shallow level, without retracing more than 50% of XA. Then C must also fail to fully reverse the prior move before D extends deeply. Only then does the structure become a Bat candidate.
That is why a Bat should be judged as one package: shallow B, deep D, and invalidation beyond X. If you think of it merely as a pattern that appears later than a Gartley, your stop location becomes hard to anchor.

B Must Stall at a Shallow Level
In a Bat, B usually stops around the 38.2-50% retracement of XA. A shallow B means the initial move has not yet been meaningfully reversed. That is what allows D to later travel deep while still letting you place a tight stop beyond X.
If B is 38.2–50% of XA, read it as a Bat. Inside the Gartley allowed band of 50–70%, a B near 61.8% is a Gartley. From 50% to 61.8% the two names overlap, so do not settle it from B alone. Also see whether D sits closer to 88.6% (Bat) or 78.6% (Gartley). Waiting only for 88.6%, the way a Bat does, can miss a Gartley reaction that would have shown up earlier.
The shallower B is, the cleaner the Bat's D zone becomes. If B is ambiguous, first check whether the PRZ width and the distance to X invalidation are manageable.

The 88.6% D Sits Just Before X
The Bat's D point usually forms near the 88.6% retracement of XA. This area nearly tests X, but does not break it. That is why the stop can be placed beyond X or beyond the PRZ with only a small buffer.
A good Bat PRZ combines the 88.6% retracement, BC projection, and an AB=CD candidate in a narrow area. Distinguish it from a Gartley first through the shallow B and the 88.6% D retracement. A Bat's AB=CD is often extended, with CD at 1.27 or 1.618 times AB, but equal length is also allowed. The AB=CD shape alone therefore does not separate a Bat from a Gartley. Because D is deep, a wide PRZ can quickly expand the stop. If the zone is wider than 0.7x ATR(14), it is usually better to reduce size or watch instead of trading.
A deep D does not guarantee a reversal. If anything, it means one side of the market has enough force to drive price close to X. That is why entry requires a tail at D and a close back inside the zone.

A Bat Is Worth Trading Only When the Stop Is Tight
The Bat's advantage comes from the ability to keep the stop close. In a bullish Bat, the default invalidation area is beyond the X low. In a bearish Bat, it is beyond the X high. If that distance becomes too large, the reason to trade the Bat becomes weak.
B stalls within the 38.2-50% retracement range of XA, and the D candidate forms near the 88.6% retracement of XA.The 88.6% candidate, the BC 1.618-2.618 extension, and the modified AB=CD target overlap within 1.3% of current price.Price pierces the PRZ, then closes back inside the zone within the next 1-3 candles.Entry is taken on the first retest after the recovery candle.The stop is placed 0.2-0.3 ATR beyond X.If price holds two closes beyond X, abandon the Bat read and exit.
PRZ width is the gap between the candidates. This article's setup requires that gap to be within 1.3% of the current price, and on the 4-hour chart and above it also checks whether the gap is within 0.7 times ATR(14). If either limit is exceeded, analyze only and do not trade.

Holding After X Breaks Is the Most Common Trap
Because the Bat has a deep D, traders often feel tempted to delay the stop. The hope is that price may briefly break X and then recover. But once price holds a close beyond X, the core Bat structure should be treated as broken.
Another trap is calling every deep retracement a Bat. In a strong downtrend, price can also rebound briefly, fail, and fall back toward the 88.6% area. The stronger the higher-timeframe trend is in the same direction, the stricter your confirmation must be before trading a Bat reversal.
Strict confirmation here means that if the 4-hour or daily EMA slope is still pointing against the reversal, you should not enter on the first touch. At minimum, price needs to return into the PRZ and reclaim the most recent minor swing. OI or volume should also decline or turn in the direction of the reversal. If the higher-timeframe trend is moving against the Bat reversal and you enter at D without confirmation, it is no different from averaging into a losing trade.
So the Bat is a pattern built around defining the loss first. Its edge only works when invalidation beyond X is close.
The Deeper D Is, the Stricter Confirmation Should Be
A deep D means buyers or sellers have already been pushed hard. Entering immediately on the first touch is risky. Price should return into the zone, defend the retest, and show at least a minor swing high or swing low shift before entry.
In short, 88.6% in a Bat is the area to watch before entering. Beyond X is the invalidation zone, and the actual entry is decided by the reaction that forms between the two.
