OptiNod Academy
Harmonic PRZ Patterns: Read the D Point as a Price Zone
Harmonics only become trade candidates when the PRZ width, first reaction, retest, and invalidation all line up.
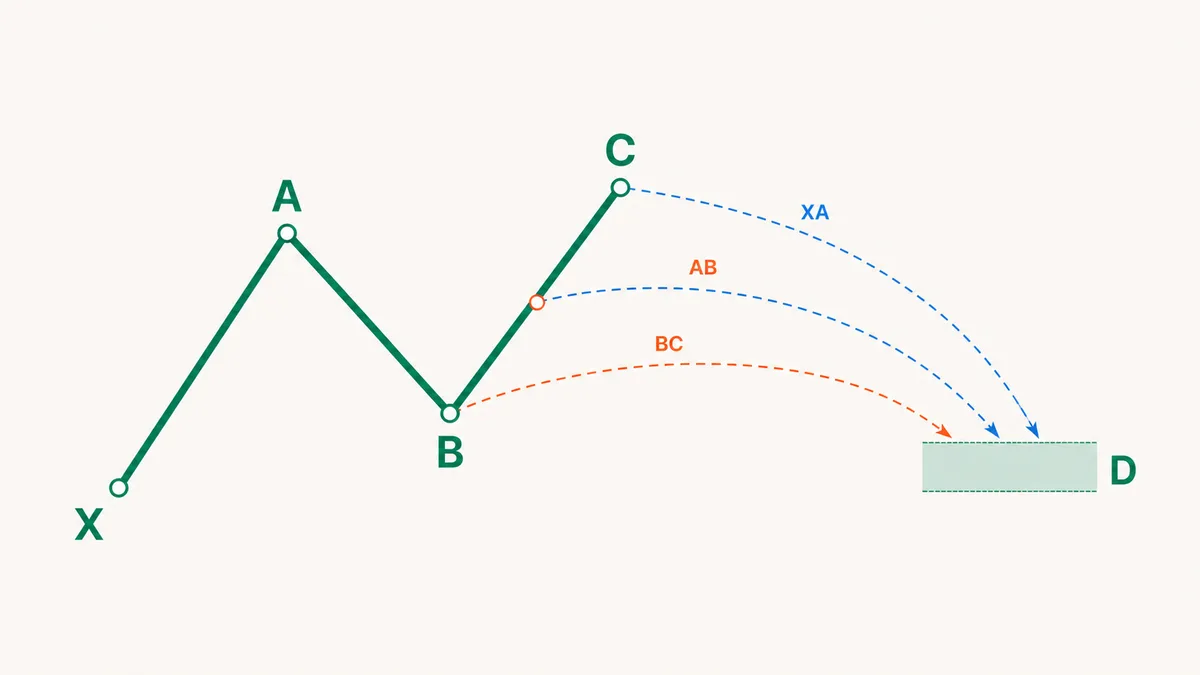
In a harmonic pattern, the D point is a zone where ratios overlap and price must react. It should not be treated as a single price.
Harmonic patterns come in many forms, including Gartley, Bat, Butterfly, and Crab, and their ratios can be complex. If you focus only on names and numbers, you can miss what matters most at the D point.
The focus of this article is the PRZ, or Potential Reversal Zone. A harmonic becomes tradable only when multiple Fibonacci ratios converge around the same price area, price reacts inside that zone, and the invalidation level is close enough to define risk. Do not bet in the opposite direction just because price has reached D. Consider a trade when the PRZ width, the first reaction, and invalidation line up, and treat a retest that holds as a more certain entry.
First, let’s clarify the terms. XABCD refers to the five swing points that form a harmonic pattern. XA is the initial impulse leg. AB and BC are the intermediate retracements. CD is the final leg that reaches the PRZ. AB=CD is a first-pass check of whether the AB and CD price legs are roughly equal in length; time symmetry is overlaid as an additional confirmation condition in the AB=CD article's operating rules. The BC extension is a supporting measure of how many times the BC length the move from C to D travels (for example, 1.27 times or 1.618 times).

Ratios Matter When They Overlap
In harmonic trading, a chart can look like a pattern even when only one ratio lines up. A reliable PRZ, however, has several ratios overlapping inside a narrow range. The more the XA retracement, BC extension, and AB=CD target point to the same area, the more weight that area carries.
If the PRZ is too wide, the trade plan becomes unclear. For example, if a PRZ spans 4-5% of the current price, it becomes difficult to decide where to enter and where to place the stop. A reliable PRZ is narrow enough to define a clear stop, even after accounting for the asset’s normal volatility.
At a candidate D zone, check two things immediately. First, do the ratios point to the same area? Second, does that area overlap with meaningful recent support or resistance?

Judge D by the Reaction
It is not enough for price to reach the candidate D zone. A PRZ is only an area where a reversal may occur, and price decides whether it actually does. You first need to see a reaction inside the zone, such as a tail, an engulfing move, or a small structural shift.
In a strong trend, price can break straight through the PRZ. If you keep holding only because the pattern has a harmonic label, losses can grow quickly. If there is no first reaction at D, or if price reacts briefly and then moves back outside the PRZ, the pattern should be abandoned.
Stops Belong Outside the PRZ
A harmonic stop should sit where the pattern’s logic breaks. For a bullish harmonic reversal, the default stop is below D. For a bearish harmonic reversal, it is above D. Using a fixed percentage stop from the entry price often conflicts with the actual pattern structure.
In an XABCD structure, the XA retracement, BC extension, and AB=CD target overlap within a 1.2% PRZ.After price first touches the PRZ, it forms a long tail, and the next candle closes back inside the zone.Enter at the close of the return candle or on a retest of the PRZ.Place the stop 0.3 ATR beyond the outer edge of the PRZ (for a bullish reversal, the bottom of the PRZ). Even before the stop, if price closes outside the PRZ for two candles in a row, drop the reversal read and exit.

The Biggest Harmonic Trap Is Forcing the Numbers
Harmonic patterns use many numbers, which can make them look precise at first glance. But the more numbers involved, the easier it becomes to fit them onto an old chart. On a completed chart, almost any ratio can be made to look convincing.
In live trading, what matters is how price behaves at the current D zone. A clean historical pattern is not enough to create a trading rule. If the ratios are perfect but there is no reaction, there is no trade. On the other hand, even if the ratios are slightly wider, the setup may be worth watching if the PRZ overlaps with support or resistance and price reacts clearly.
Harmonics are read with the PRZ at the center. The details of partial exits and of calculating PRZ width are covered in the PRZ playbook. Here it is enough to set the order: zone, reaction, invalidation.
Check PRZ Quality First
Even if the harmonic classification is correct, you should not trade it if the PRZ quality is poor. PRZs are commonly grouped into three grades.
- Grade A: Three or more ratios overlap tightly, the zone aligns with higher-timeframe support or resistance, and the first touch produces a tail or a close back inside.
- Grade B: The ratios overlap, but the structural location is weak or the reaction comes late.
- Grade C: The numbers fit, but price does not respond.
In practice, only Grade A setups deserve normal position size. Trade Grade B setups at half size or less, or keep them only as watchlist candidates. Grade C setups should not be traded at all. In the end, what matters in harmonic trading is whether the PRZ is tight enough to define a stop and whether price has actually reacted.

Once Price Breaks Through the PRZ, the Harmonic Is Over
Harmonics are not designed for trades that linger at D. A PRZ is a zone where you expect a possible reversal, but if price breaks outside that zone, it should be treated as a sign that the trend in the opposite direction is stronger.
That is why a harmonic setup is closer to a conditional plan. It is not an automatic reversal signal. When price reaches the PRZ and a reaction shows up, consider the entry. If it also holds a retest, the entry is more certain. If price leaves the PRZ, the idea ends there.
